
Polarith AI


1.8
Now that the concept of context steering is known, let's begin to work with Polarith AI which makes it very comfortable to use these great algorithms. This tutorial section describes the setup of a simple agent which wants to reach interesting objects, whereby it should not get to close to dangerous objects. Although this guide uses sprites for a 2D setup, you can easily do the same with meshes for 3D applications. Always when a certain AI setting would differ for 3D, it will be mentioned.
If you do not like to read this tutorial any further, no problem, go ahead and let one of our many example scenes coming together with Polarith AI inspire you how to make use of the software. You may also want to have a look at our basic tutorial videos.
Before we go on, a general thing about working with Polarith AI. Every component which belongs to the movement module (which is currently the only module of Polarith AI) is prefixed with AIM (Artificial Intelligence for Movement), thus, you get all available components by simply typing this prefix into Unity's project search. Alternatively, use the menu for adding components which we tried to make as clean as possible for you.
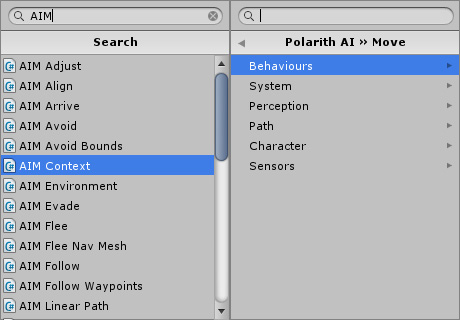
Figure 1: Typing AIM gives you all movement components of Polarith AI. Alternatively, you can use the tidy component menu.
For going through this tutorial, you are welcome to use the following sprites if you want to. There is a triangular one for agents, a circle for interesting objects and another polygon for dangerous objects.


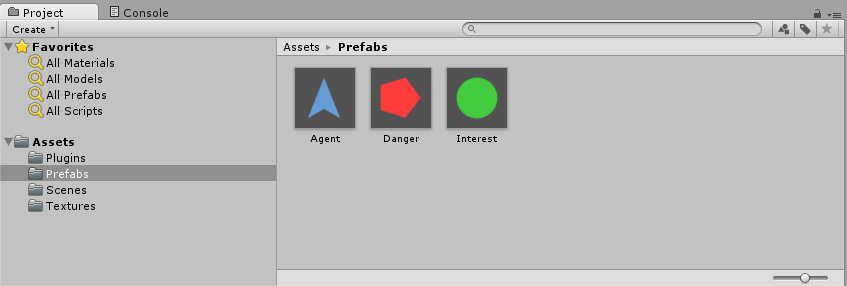
Figure 2: Example assets which can be used for the scene setup.
We designed the user interface of Polarith AI for working as efficient as possible without taking too much vertical space. Therefore, we use two different approaches. First, as you will notice in the following screenshots, most components have got two or three category tabs at the upper right corner. These tabs allow you to display different aspects of every component. For the Context component (which we are going to discover first in the next section), there is one tab for general settings, one tab for the visualization and another one providing a handy wizard for quick setups of basic agents. Second, all behaviour components have got a button to toggle advanced settings which are hided by default. These will be useful later when you already get used to the basic parameters for achieving great AI behaviour like boids, herds and flocks.
If you feel more comfortable to learn things by doing instead of reading through tutorials like this, go ahead and just try the wizard. In three easy steps, it can help you with the setup of your first very own agent. For the friends of reading, let's get to the first and most important component of the system now.
Now it is time to start creating a first movement AI! Excited? We are! Because we want to show you how comfortable it is to use Polarith AI. As for the rest of this guide, we do not want to go into detail for each setting here. For this, you can consult the rest of the (online) manual where every component and every setting is explained in much more detail.
The most important component every agent needs is a Context. It is the very foundation that connects everything, executes the main AI algorithms and stores the objective data. Let's use our agent prefab and attach a Context to it.
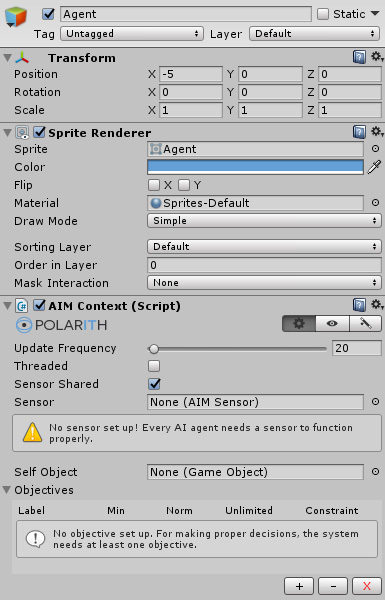
Figure 3: This is how a newly attached Context looks by default.
Now we have got a Context, the first thing we do is to set up how many objectives our agent should have. In our case, we want it to have two of them: interest and danger. For adding objectives, you can simply click the small plus button at the bottom right of the component. After adding them in, we configure them: the first objective should be interest, so we uncheck the min option so that the agent maximizes this objective (and this is exactly what we want to do with interesting things), we leave danger as it is since it should be minimized. The algorithm which does the multi-criteria optimization always requires exactly one objective which is not constrained or unlimited. This should be the most important objective for the agent, so in our case, interest is unlimited. Another thing we do right now is to set a constraint for the danger objective because it needs to be limited. Since both objectives are normalized by default and thus the corresponding objective values lie always between 0 and 1, we set the constraint to a moderate value of 0.4. If we have done all that, we get an Context component as shown in the figure below.
Well, now that we have configured something, what does it mean for our agent? The AI interprets our setup as the following: "I majorly want to go to interesting things, but therefore, I do not consider solutions which have got a danger value being greater than 0.4...".
Another note on objectives: the multi-criteria optimization pipeline uses the so called epsilon-constrained method. It belongs to a class of algorithms which are suitable for a relatively low number of objectives. For best results, we advice to use no more objectives than 5.
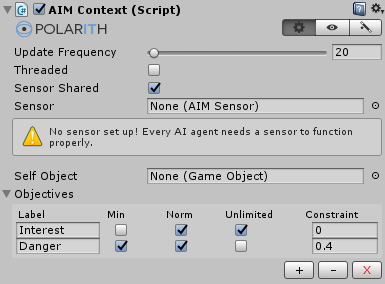
Figure 4: The Context component when it is configured as described.
Our agent already knows what to do with objective values. But how to obtain them? The answer is: with a sensor. So, let's create a PlanarSensor asset, for example via Unity's assets menu. Now, there is a PlanarSensor created which is ready to be configured. We can name it CircleSensor because we configure like this one just in a moment.

Figure 5: Creating an PlanarSensor and naming it CircleSensor .
As suggested by its name, we are going to set up our sensor as circular sensor. Therefore, we use the inspector editor of the asset to create a circle sensor having 16 receptors with a radius of 0. The circle is by far the most general form a sensor can have. It is suitable for many applications, 2D as well as 3D. Note, for a 3D scenario with a ground plate, PlanarOrientation should be set to PlaneXZ since this plane is the default for a virtual 3D ground in Unity. For general 3D scenarios, you need to use the SpatialSensor. If you want to know more about other or custom sensor shapes, read the documentation about the PlanarSensor and PlanarShaper. The shaper component allows us to directly visualize the sensor we have created, but for simple sensor shapes like circles, the asset inspector is sufficient enough. Complex sensor shapes might come into handy when having special restrictions on the movement of characters, e.g., for certain kinds of 2D games like Pong or platformers.
Note, the overall system performance is strongly dependent on the number of sensor receptors which all agents have.
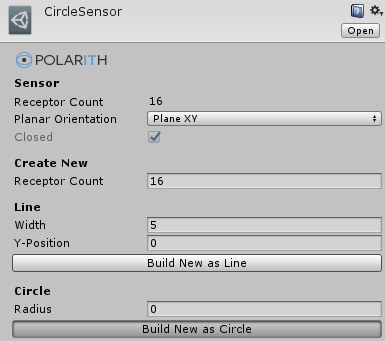
Figure 6: Setting up a circle sensor.
Now we have got a circle sensor and an agent prefab, so let's combine them as shown in the following figure.

Figure 7: Here, we have associated the created sensor with the prefab of the agent.
If we create a game object within a scene based on the agent prefab, we can enable and see the so called indicator gizmo which every Context has in the scene view. Note, this gizmo is only shown while the application is playing because it visualizes the currently sampled objective values which can only be there when the application is running. If we enable the show receptors for the indicator, it also visualizes our circle sensor. Note, that you need the AIMContextIndicator to visualize spatial sensors.
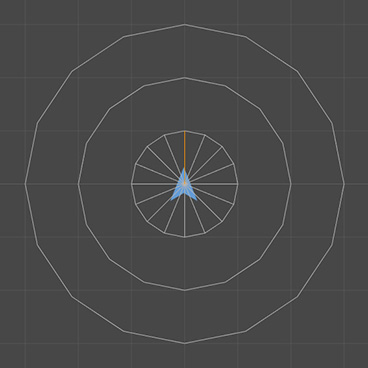

Figure 8: There is our agent. While the application is playing, we can see the sensor visualized by its indicator gizmo.
We have got an agent including a sensor, hence we are now ready to set up a small scene, e.g. with one agent, one interest object and one danger object. For our example scene, objects are not further away than ~10 scene units. If you do the same, you can rely on the same parametrization which is used in later steps of this tutorial.
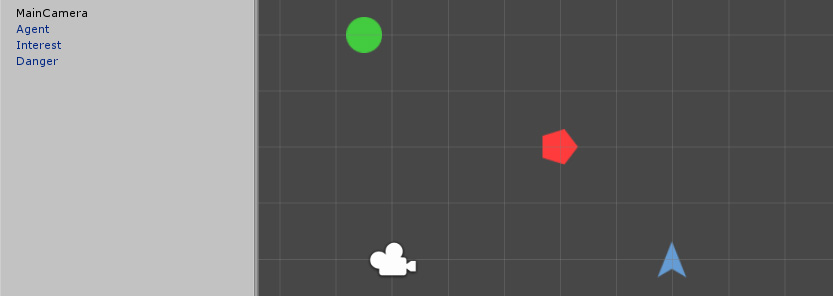
Figure 9: Example scene setup which consists of the agent, one interest and one danger object.
For the agent to perceive the created objects, we use the so called perception pipeline of Polarith AI. Although the behaviours offer you the possibility to perceive objects directly, as you will see in the next section, we strongly advice that you use the method which is introduced here. Using the perception pipeline will increase performance dramatically (also by preventing GC allocations), especially for multiple agents which should observe the same things. At first, you need an object (maybe its based on a prefab, too) which will hold the appropriate components. We name it "Environment" and we attach two Environment components to it, one for holding the interest object which we label with "Interest" and one for the danger object which we label with "Danger". Within the game object lists, we put in the appropriate objects for interest respectively danger. In addition, we attach the SteeringPerceiver component to the same game object. At runtime, this is the component which extracts the relevant data of the given environment objects so that the AI behaviours are able to access them. As the name suggests, these are information which are typical for steering. Optionally, we can take additional control on what is perceived with the help of the SteeringTag which can be attachted to a perceived object but this is out of this tutorial's scope.
Note: Instead of specifying single objects within game object lists, you can specify whole layers for the environment to obtain objects from. This mechanism can only be used for objects which are active at runtime start and it is especially useful for prefabs. When you assign a layer to a prefab, all objects you create in the scene based on this prefab are automatically in the prefab's layer, too. That way, in the editor, you do not need to specify new objects in environments if the appropriate layer has already been set. This can boost up your workflow a lot.
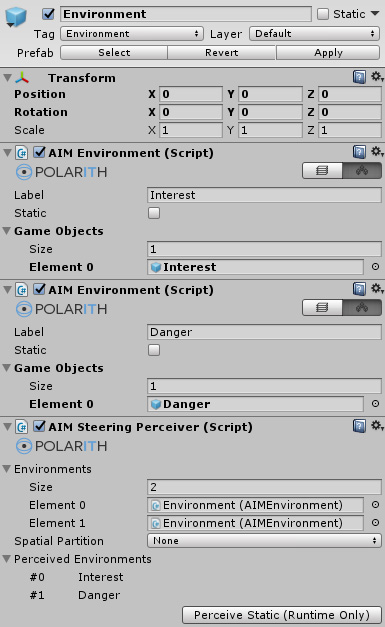
Figure 10: Environments for interest and danger including a perceiver which receives the given game objects at runtime.
From now on, the "Environment" game object serves as perceptional container enabling agents to observe the world around them. For this to work, an agent needs a SteeringFilter component which takes a reference to the object having the SteeringPerceiver attached. By plugging in a perceiver into a filter, all AI behaviours attached to the corresponding agent are able to work with the data of the associated environments.
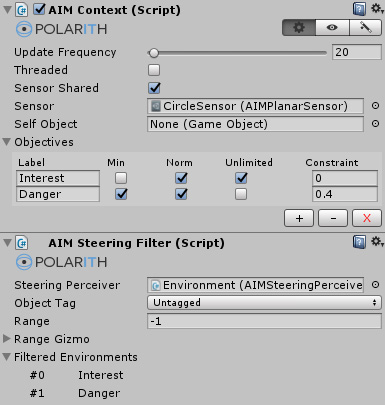
Figure 11: The agent has got an SteeringFilter, whereby the "Environment" object is plugged in as source for a perceiver.
So far, so good. We have prepared enough to work with every inbuilt AI behaviour we want. To keep things simple for this introduction, we are going to only use the Seek steering behaviour for both sampling interest and danger.
So, let's attach two Seek components to our agent (prefab) and configure them as shown in the figures below. We want one behaviour to get its data from the interest environment and the other one to get its data from the danger environment. For the interest Seek, we also enable the so called outer radius gizmo which draws a circle within the scene view indicating which game objects are relevant for the behaviour. Many of Polarith AI's behaviours are derived from AIMRadiusSteeringBehaviour so that they utilize two radii to decide whether a percept is relevant to be processed. A percept is what a game object becomes when it gets received by a perceiver or if it is directly perceived via a behaviour's list of game objects. To be recognized, a percept needs to be located between the inner radius and outer radius. You do not need to worry that the agent may perceive itself if the inner radius is 0 because the self percept is always ignored. We set the outer radius to 10 because this is enough for our small scenario. In addition, we must set the target objective of the danger seek to "Danger" because it should write the sampled objective values into the second objective we use as danger. If you build a 3D setup, have a terrain or the locations of your game objects differs in height significantly, you should set the VectorProjection to PlaneXZ for getting accurate results in 3D. Analogously, if your sprites in a 2D setup have got different z-values, you may need to set VectorProjection to PlaneXY. You can find this parameter by activating the advanced view with a click on the button showing the circle icon (left of the tab bar in the behaviour inspector).
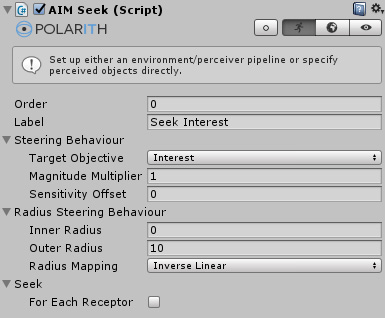
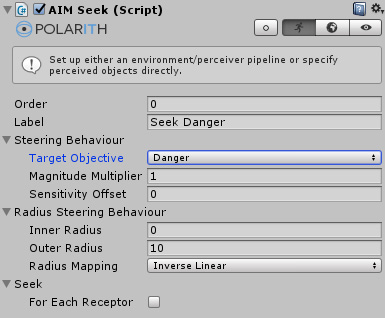
Figure 12: Two Seek components for sampling the world: one for interest and one for danger.
Before we can start, we need to tell the behaviour what it should perceive. Fortunately, we prepared everything which is necessary for that. Thus, the last step is to switch to the environment tab like in the figure below and set the environments properly. The interest Seek gets the filtered environment "Interest" and the danger Seek the "Danger" environment.
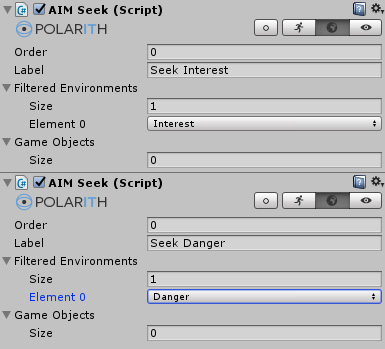
Figure 13: The environment tabs of the two Seek behaviours with the corresponding filtered environments set up.
Okay, it is time to hit the play button and to see what happens. Therefore, we activate the gizmos in the scene view to see what is going on. Nice, it seems to do its work already. Note, the behaviours we just applied use the positions of the perceived game objects in their algorithms. Of course, Polarith AI also includes behaviours dealing with collider/visual bounds or with Unity's navmesh structure.
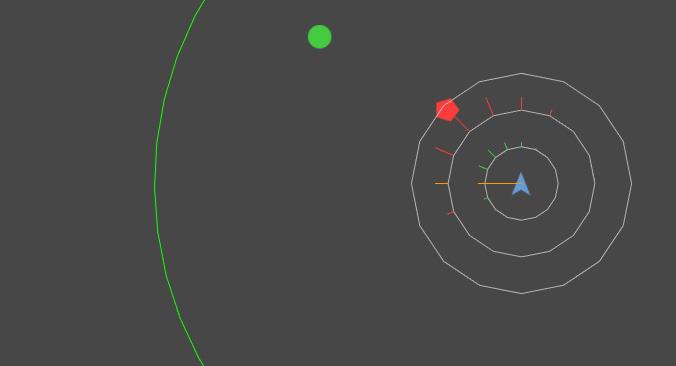
Figure 14: Here, we see that the AI system is already working. We also get a decision response for the direction to go towards, it is colored orange.
Before we use the made AI decisions for moving our agent around, we are going to attach another two behaviours: Stabilization and PlanarInterpolation. We advise to use these so called processing behaviours in most of your setups to get much smoother and better looking results. Processing behaviours have no concrete counterpart in classic steering, so we decided to name them different. Stabilization adds interest along the last Decided Direction of the Context. Normally, this direction matches with the movement direction of the agent. Consequently, Stabilization is useful in order to stabilize the agent's movement. Another interesting thing is that the Stabilization component, like every other processing behaviour, has got a default order of 1000 because in most cases, we want it to be processed after all other steering behaviours due to the fact that they mostly modify the objective values which are already there.
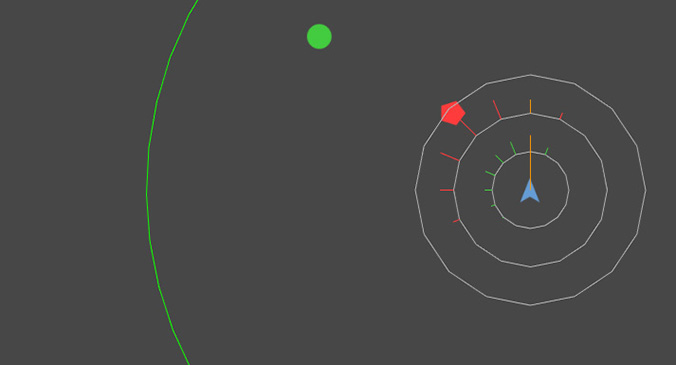
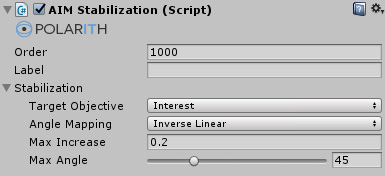
Figure 15: Stabilization let agents prefer solutions which hold their course. So the orange colored decision differs from the last screenshot, it is oriented towards the agent's movement direction.
The other behaviour we attach is the PlanarInterpolation. With its help, we can get smoother results without raising the number of sensor receptors, and thus, we get better results with nearly the same performance. In our case, based on the sampled objective values, it is able to precisely reconstruct the original position of the interest object. Note, the order of this component needs always to be equal to or greater than 2000, because in order for it to work, it needs to be executed after the system made its decision, which is the case for each behaviour having a 2xxx order.
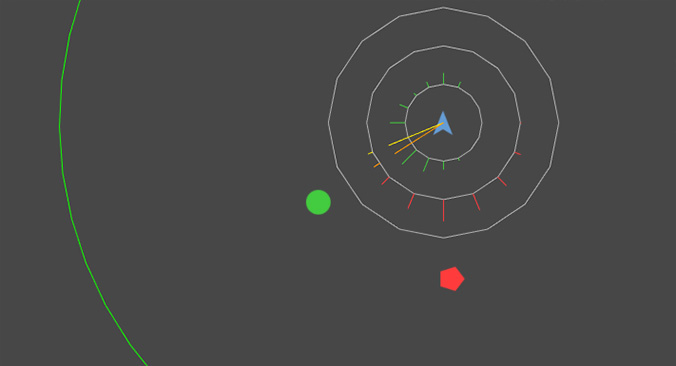
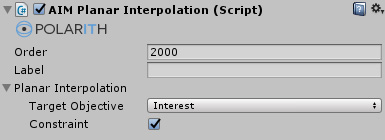
Figure 16: PlanarInterpolation is responsible for finding better solutions in between receptors after a decision is made. The interpolated solution is orange, whereby the originally found solution is colored yellow. For illustrating the result more clearly, we dropped the agent to another place.
Now that we have built a working agent, we need to let it move. Usually, you should use your own awesome controller which matches your application or game best. Therefore, you can simply get the Context component of your agent and directly access the made decision and all necessary information. The following abstract example should demonstrate how it works.
Alternatively, Polarith AI provides some very simple character controllers to see results quickly. They are suitable for those of you who want to experiment and play around with the AI to explore what it is capable of before you use it in your own project. There are controllers for 2D as well as for 3D for both direct movement and physics-based movement which looks, of course, a lot smoother and more natural. Note, context steering algorithms can profit a lot by the time-based cohesion which is a result of every physics controller. Something similar is achieved for classic steering by using the so called steering forces for a direct controller. To keep things simple, we are going to attach the AIMSimpleController2D to our agent prefab for letting it move. Yeah, it finally does!
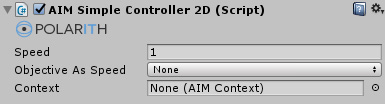
Figure 16: That's it, our first moving agent using Polarith AI. That wasn't so difficult, was it?
The prior example is, of course, very simple. In a real game, you are most likely confronted with more complex scenarios. Although combining behaviours is very powerful, it is hardly possible to find a combination of behaviours that perfectly handles all situations. For example, a car driver has to follow different rules when he drives in a roundabout or on a highway than on a normal priority road. In order to achieve something like that, we advise using AI states. An AI state is a set of behaviours that are optimized for a special situation. To decide which state should be active, a higher planning logic must be present. There are several solutions you can use: A first idea might be to use the state machine that is included in Unity (Mecanim) And this is a good idea! By using the behaviour labels, it is possible to activate or deactivate single behaviours for each Mecanim state by inheriting from StateMachineBehaviour. Another option would be to have multiple AI game objects for your agents and to activate one at a time only when it is needed.
Let's stick to the car example: Another thing a car driving NPC needs is pathfinding. Since our Pathfinder update (>= v1.4), it is easily possible to use pathfinding in combination with Polarith AI through in-built behaviours (Pro only). Besides the possibility that you can directly define paths (e.g. for patrols), we utilize the pathfinding included in Unity. And do not worry if you already have your own pathfinding solution running like A*. We designed our system such that it is very easy to write an adapter for arbitrary pathfinding solutions out there. For further details about this topic, check this manual page.
We hope this guide was helpful. At this point, you have seen the major workflow of how to use Polarith AI. Now, you have a whole new world to explore. As you hopefully have noticed, context steering works similar but also different to classic steering. It has a lot of major advantages compared to classic approaches, but it often will force you to rethink the use of certain behaviours you might already know from classic steering. The detailed parts of the (online) manual will help you as well as the many example scenes we ship with Polarith AI, and if you are confronted with a problem you may need individual help for, do not be afraid to ask us directly. We will help you as best as we can because we like our customers to be happy.
What to do next? This majorly depends on your general programming and Unity experience. We can give you the following hints.