
Polarith AI


1.8
front-end: AIMPlanarShaper
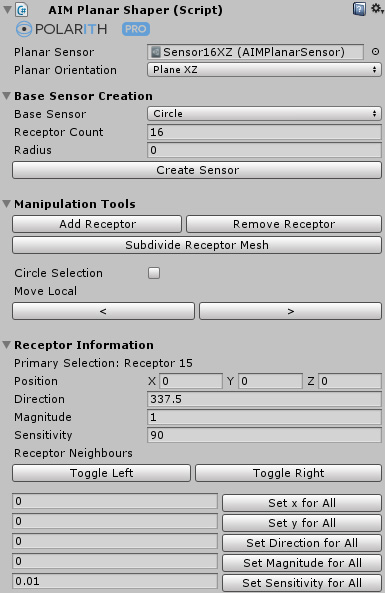
For most cases, the two basic shapes line and circle are sufficient enough. However, if you need a custom sensor shape, e.g. if you want an agent to perceive the world differently at its front than at its back, you can use this tool. So the shaper is designed to customize your planar sensors. To use it, simply attach an Planar Shaper component to a game object and plug in the sensor asset you want to customize. It is recommended to do this in an empty scene so that your view is not cluttered by other scene elements.
Let's go through this very useful component step by step now.
After plugging in a sensor asset which should be customized, we are ready to use the tools. The first section is redundant to the simplistic inspector of the Planar Sensor asset itself. Here, it is also possible to create a base receptor setup for a line or a circle.
When customizing a sensor asset, its problem space representation is shown within the scene. There, it is possible to select and manipulate receptors visually, as shown in the figure below.
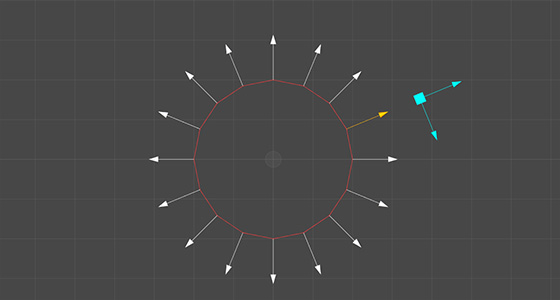
Figure 1: Shows a selected receptor.
This is the default.
left mouse Selects a receptor.shift + left mouse Deselects a receptor.Activate this mode via the Circle Selection checkbox or just use the key combination shift + q.
left mouse Every receptor within the circle range is selected.shift + left mouse Deselects every receptor within the circle range.alt + mouse move Adjusts the circle size.Once a receptor is selected it can be manipulated directly through the visual tools or via the inspector of the Planar Shaper. Besides that, new receptors can be added, removed and subdived as well.
By clicking on Add Receptor, a new receptor is created with the following attributes.
Position = (0, 0, 0)Direction = (0, 1, 0)MagnitudeMultiplier = 1Sensitiviy = 90Note, by ctrl + left mouse clicking into the scene, a new receptor is created at the position of the cursor and the last receptor (having the greatest index) before the insertion is set as its preceding neighbour.
Removes the selected receptors and re-consolidates the indices as well as all neighbourhood relations.
Subdivides all selected receptors, meaning that between every two adjacent receptors a third one is added, see Figure 1 below.
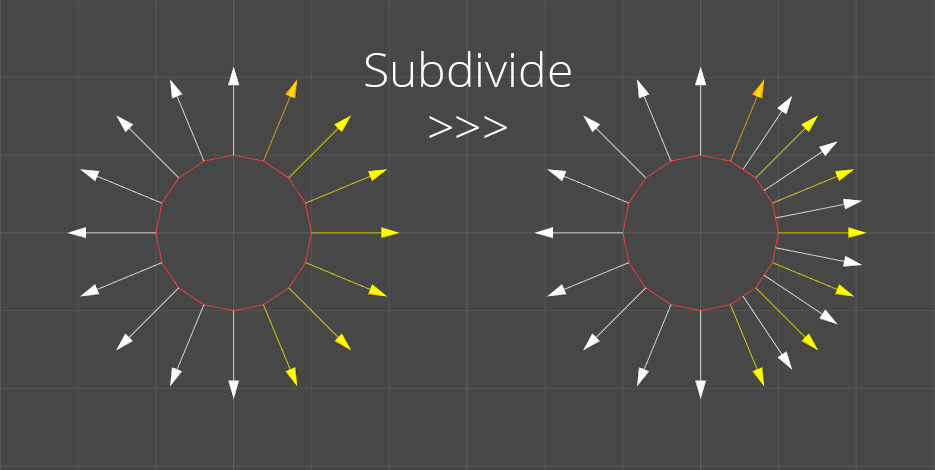
Figure 2: The effect of the subdivision tool. Only selected receptors are affected.
To transform a receptor as needed, hit the arrow buttons to switch the active tool, or just use the following hotkeys.
| Hotkey | Tool | Description |
|---|---|---|
shift + 1 | Move Local | Translates the receptor along its direction or co-direction. |
shift + 2 | Move Global | Translates the receptor along the global x/y-axis. |
shift + 3 | Rotate | Manipulates the receptor direction through rotation. |
shift + 4 | Scale Magnitude | Changes the receptor magnitude. |
shift + 5 | Scale Sensitivity | Changes the receptor sensitivity which is visualized through the symmetric dotted lines. |
When editing a single selected receptor, the exact values are shown and updated within the inspector. If multiple receptors are selected, then the orange colored receptor represents the primary selection which is shown in the inspector as well.
These values can be manipulted directly via the in-scene manipulation. The only thing which must be done from within the inspector, is the neighbourhood toggling. Just hit the buttons to toggle the preceding (left) or subsequent (right) neighbour of a receptor. The neighbourhood is visualized through the red line between two receptors.
If more than one receptor is selected, multiple fields and controls appear in the inspector. With these, it is possible to set the same values for all the selected receptors, hereto, it is important to confirm your input with the buttons at the right.