
Polarith AI


1.8
Here, you get to know more about the API of Polarith AI but for a better understanding, please, be aware that you have properly understood the major concepts of context steering before you go on reading. This is especially essential if you want to write your own custom behaviours. Moreover, it would help a lot if you have already worked with Polarith AI so that its clear to you how AIM (Artificial Intelligence for Movement) components work. For more detailed examples, have a look at our source on GitHub.
Before we will have a closer look at the code, let's introduce the different modules of Polarith AI.
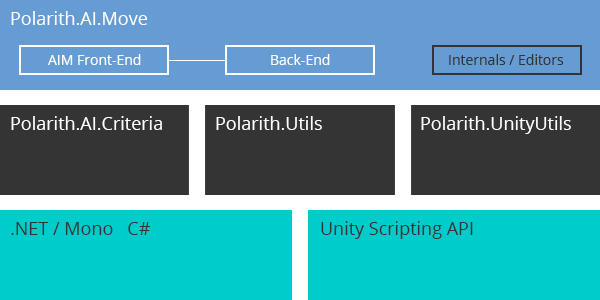
Figure 1: Illustrates how Polarith AI is built and how its modules are interconnected.
Polarith AI is written in C# using the standard API which Unity offers for .NET/Mono. Of course, huge parts of the code are based on the Unity Scripting API, too. With these as a basis, different modules (which equal to namespaces in code) were built. Polarith.Utils and Polarith.UnityUtils provide general functionality our team needs for its development, these are most likely to be shared across different projects of ours. Then there is Polarith.AI.Criteria which includes all interfaces and abstract classes for building a working multi-criteria optimization pipeline, and this is exactly what we achieved with Polarith.AI.Move for the 3D vector space. So, Polarith.AI.Criteria is some kind of template and Polarith.AI.Move is its concrete implementation. The latter of these two is the most important one you will always use in code. That said, theoretically, you can implement the same kind of algorithms we did for Polarith.AI.Move by implementing the interfaces and abstract classes of Polarith.AI.Criteria using a different kind of problem space, for instance, strings instead of a vector space. This would let you solve general multi-criteria optimization problems besides character movement. Sorry, I definitely got carried away to much. So, back to the movement.
As you can see, Polarith.AI.Move separates into another hierarchy. The most important aspect which you should keep in mind is that there is a front-end as well as a back-end. The front-end is what you use while working with components of Polarith AI. So, you can see that something belongs to the front-end because of the AIM prefix. For each front-end component, there is also a corresponding counterpart in the back-end, usually, these back-end classes are named like their front-end complements but without the AIM prefix. This software design is necessary to achieve complete multithreading support due to the fact that anything which belongs to the Unity Scripting API is not thread-safe at all except structs.
Finally, we are going to code now! We start with a back-end behaviour which is suitable to support multithreading, whereby in the next section, we will write the corresponding component for the front-end. To keep things simple and to get a clear understanding of the system, we implement a very simple and good old classic steering behaviour: our own Seek.
If this is too basic for you, then visit the product repository of Polarith AI on GitHub. There, we make most of our behaviours open-source so that you are able to study them for getting more ideas of what you can achieve with our software.
Here we go.
The above code is all it takes to implement a simple Seek behaviour. Polarith AI takes care of the rest. Let's go through this step by step. Of course, we need to use appropriate namespaces in order to access the needed functionality. The first one is for Polarith AI and the second one let us use the serialization attribute.
MySeek inherits from RadiusSteeringBehaviour which is one of four possible base classes every back-end behaviour needs to be derived from. RadiusSteeringBehaviour is a suitable base class for each behaviour which needs to utilize some kind of view radius in order to determine if a perceived object is relevant. Therefore, this base behaviour has got an InnerRadius and an OuterRadius. An object needs to be located in between these radii to be recognized. In addition, we mark our class with the Serializable attribute so that Unity is able to serialize our data for persistence. Then, there are two properties every SteeringBehaviour (and all derived classes such like RadiusSteeringBehaviour) needs to implement: forEachPercept and forEachReceptor. They determine whether the corresponding methods PerceptSteering() and ReceptorSteering() are called within the main algorithm. So, we implement these properties by using the public field ForEachReceptor which is serialized in Unity.
As we already noticed, every SteeringBehaviour (such like RadiusSteeringBehaviour) provide a bunch of pre-built functionalities which are very useful for writing behaviours easily. What quick references and special methods a concrete class provides can be read in the corresponding parts of the API reference. So, for implementing behaviours, there are three methods which can be overridden to inject code into the system: StartSteering() which is called once for each percept to pre-compute preliminaries, PerceptSteering() which is also called once for each percept and ReceptorSteering() which is called for each percept for each receptor of the associated sensor. In our example, we implemented the last two because RadiusSteeringBehaviour already provides a decent StartSteering() method. This is the reason, why we have these startDirection and startMagnitude variables which come in handy when we implement the methods, they are computed in the StartSteering() method of RadiusSteeringBehaviour. Now, let's have closer look at the methods.
The purpose of every SteeringBehaviour is to assign values for the inbuilt fields ResultDirection and ResultMagnitude. With the help of these two values, the main algorithm which is implemented in SteeringBehaviour computes and writes objective values for each receptor of the associated sensor. Therefore, it compares every receptor direction with the given ResultDirection and writes a portion of the set ResultMagnitude into the targeted objective with respect to the accordance of the two compared directions (in fact, this depends on the angle between these two directions). The main difference between these two methods is that PerceptSteering() uses pre-computed values which are automatically obtained for each percept in the base class, as against ReceptorSteering() computes this values on its own. This is necessary because in the receptor method, we want the system to consider the position of the receptors instead of the pure agent position. The same holds true for the resulting magnitude which is obtained by mapping the computed distance between the receptor and the percept to the given radii. This is important to support sensors where receptors have got different positions, like for instance a line sensor. Moreover, all vector computations in behaviours are done in world coordinates.
As you can see, we have no direct access to perceived game objects. Instead, our system provides so called percepts which corresponds to a perceived game object. Percepts are containers storing all data necessary for writing behaviours. Currently, there is only one type of percept called SteeringPercept which provides all data needed for implementing steering behaviours. These data were extracted from Unity's classes through the perception pipeline so that they are thread-safe to use in behaviours. So if you want your behaviours to be thread-safe in order to support multithreading, you must not use any classes belonging to Unity's Scripting API, especially, prevent the use of GameObject. That said, it is totally fine to use Unity's structs and all the types of Polarith AI.
Besides the mentioned RadiusSteeringBehaviour and SteeringBehaviour, the time might come when you do not want to use the inbuilt mechanisms for writing objective values. Behaviours for which this is the case are called processing behaviours in Polarith AI. Therefore, you have to look at the base classes PerceptBehaviour<T> which let you specify your own percept containers and MoveBehaviour which is the upper base class of every behaviour.
Now that we have implemented our custom behaviour, we need to write an Unity component which fits in the system of Polarith AI. This is fairly simple so we will not go into so much detail like we did for the back-end class.
So, implementing a proper component is as easy as holding a serialized field of our back-end and to pass this through the property RadiusSteeringBehaviour so that Polarith AI is able to work with it. When your behaviour is thread-safe, its up to you to indicate that, therefore, the property ThreadSafe needs to be defined. If this is not done or you forgot this, the agent using the behaviour will not be multithreaded when the AIMPerformance component is present within the scene. To create your components, there are similar base classes like you already know from writing back-end behaviours, for example AIMRadiusSteeringBehaviour and AIMSteeringBehaviour and so forth.
As you get comfortable with writing own behaviours, there will be the moment when you need to get something done before the behaviour is executed which cannot be multithreaded because it heavily relies on Unity's Scripting API. Hence, you possibly want to inject additional data into the back-end behaviour through your component. This can be achieved very easily in different ways. First, you can always override the inbuilt PrepareEvaluation() method that is called by the system before the AI updates, evaluates the context and processes the behaviours. If you do so, we strongly advice to always call base.PrepareEvaluation(), it is needed for your component to harmonize with Polarith AI. Another way is to use a coroutine within your component or to simply use Unity's component methods like Update().
That's it for the quick start guide. Surely, there are a lot of open questions and we will try to answer them all. For this, you can rely on the (online) manual as well as on the API reference which both are continuously updated and extended over time. In addition, we will maintain a blog at our website where we will post interesting tutorials, videos and ideas on how to use our technology. If this is not enough, feel free to contact us whenever you want. We will answer your questions as best as we can. Moreover, you are welcome to visit us on GitHub, too. There, you can have direct influence on what will be the next features of Polarith AI, or, you simply report found bugs which will be fixed as soon as possible. Stay in touch! We look forward to you.